Price Change Notification

Hello Everyone,


This is just a service notice to inform you that there will be changes to some of our service fees effective as of January 1st, 2018. The price for our Custom Banner Design (Touch-up) Service as well as our Banner Installation Service will increase from $35.00 to $39.99. Our Full Banner Design Service will also increase in price from $140.00 to $159.96. For all inquiries you can call us at our Toronto office at 416-748-8788 or the toll-free number 1-844-748-8788 or email us at service@canadiandisplay.ca. Happy New Years to you all!

THE CORRECT WAY OF INSTALLING AN ADVERTISEMENT FLAG

A common item ordered, that we unfortunately cannot install for our customers, are our advertising flag products. We’ve written out a basic but thorough guide for your convenience to help you out if you are tasked with the installation of our flag products!

It is imperative that these steps be followed closely, as the chance of a failure in either hardware or flag increases with misuse. To avoid this and save time, cost, and stress here some steps that you can follow to ensure that your Advertisement Flags are properly installed:

  • Remove the contents out of the Nylon Bag. The items should include the flag fabric, the flagpole (consisting of four smaller parts), a locking pin, a clip with key ring & bungee cord, and the base attachment (cross base or ground spike).DSC00130.JPG
  • Assemble the flagpole, by putting together the 4 parts. The pieces will all connect in order of size, with the largest piece being on the bottom and the smallest one on top. The first parts of the pole will be aluminum. The proceeding two will be fiberglass. The pieces should hold together ultimately by the tension of installation.DSC00131.JPG
  • Once you’ve connected all the parts to make a single pole, pass the pole through the black fabric pocket spine of the flag. Make sure that the pole slides all the way along the pocket until the tip of the pole reaches the end of the pocket. This will guarantee that the flag is nice and taut and will provide just enough tension to slightly curve the flagpole.
  • Place the bottom of the flagpole into the base attachment (cross base or ground spike). You will notice that there is a hole that runs through both the flagpole and base attachment. This will allow the locking pin to pass through, and keep the pole secured onto the base attachment.

        DSC00133.JPGDSC00134.JPG 

DSC00135.JPGDSC00136.JPG

        (Be sure to fold the pin around the flagpole to ensure that the pole is securely attached)

  • Now that the flag is standing upright, the final step is to use the bungee cord to tie the flag fabric to the pole. The bottom-most piece of the pole will have a small silver metal plate with a hole. The clip/carabiner is meant to attach to the silver plate. Once the clip is attached on, you will pass the bungee cord through the key ring as well as the grommet at the beginning of the black fabric pocket spine of the flag. You will then tie the cord such that the flag is pulled taut over the pole.DSC00138.JPGDSC00139.JPG

DSC00140.JPGDSC00141.JPG

Congratulations! You have now successfully installed an advertisement flag, and are ready for your brand and logo to be put on display for the world to see. I would just like to note for your reference, that the base attachment spins, and as such the flag should be able to rotate at the base attachment when blowing in the wind. If the flag is not spinning then you have not installed the flag correctly. If you follow the above instructions you won’t have any trouble. Thank you for choosing Signworld Canada! We wish you the very best of luck in your future advertisement campaigns. 

DSC00144.JPG


How to Correctly install a 16′ Custom Advertising Fabric Flag with Ground Spike

So you’ve purchased our extremely popular 16′ Advertising Flag, and you’re well on your way to getting started on advertising your brand. Having difficulties setting up? Well not to worry, because we’ve put together a simple tutorial to help you get your 16′ Advertising Flag upright and ready for use! Here are some of the steps that you need to follow:

  • The first step is to remove the contents of the flag out of the box. The items should include the flag fabric, the aluminum flagpole (made of 4 pieces), and the ground spike (the only type of base attachment for this flag).DSC00148.JPG
  • Assemble the flagpole by connecting the 4 pieces together. The pieces are meant to be put together in order of diameter, with the larger diameter at the bottom, and the smallest at the top (top piece is also curved).

DSC00149.JPG

  • You will also notice that the flagpole pieces have dimples around their circumference. These dimples function as a stopper to prevent the pieces with smaller diameters from sliding into the pieces with bigger ones. It also acts as a marker that indicates which way the pole should face. The dimpled portion should be on top. 

Better Edit 2.jpgBetter Edit 3.jpg

Better Edit 4.jpg

  • Once the pole has been assembled, carefully slide the flag over the pole through the black fabric pocket along its spine. Make sure that the tip of the pole reaches the very end of the pocket, and that the fabric is pulled nice and taut. This will ensure that the flag looks appealing and functions correctly.
  • Now you will need to set up the ground spike up for the flag to stand on. You will need to hammer the ground spike into the ground. Ideally, it would be preferred to use a wooden or rubber mallet over a hammer, however as long as you’re hammering into the spike and not the stand you shouldn’t have any issues. Drive the ground spike as deep into the ground as it will go before the bottom part of the stand comes into contact with the ground.

Better Edit 1.jpgBetter Edit 5.jpg


  • Once the ground spike is securely stuck into the ground, you will place the base of the flagpole into the flag stand, connected to the ground spike.

DSC00166.JPG

Now that you’ve successfully installed the flags, you’re good to go! Let them help put you and your business on the map, and watch as the customers coming rushing in. Thank you for choosing Signworld Canada, and we look forward to seeing you again!


Branding 101: How to Create Custom Trade Show Graphics

Have you been eying one of our professional Retractable Banner Stands, or maybe even the sleek Trade Show Counter, but you’re feeling a little overhelmed by the prcoess of creating print-ready graphics?

In this blog post, we’ll put your worries to rest by explaining exactly how you can create professional looking graphics to meet our specifications. Save time and avoid headaches by going DIY!

For the purposes of this tutorial we’re going to be using GIMP, a free image editor available for download here: https://www.gimp.org/

Once the program is installed, open it up and we can begin to create the banner artwork. Click on File>New .

image-01

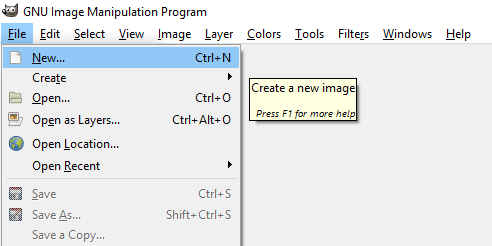
A dialogue box will appear that looks like so:

image-02

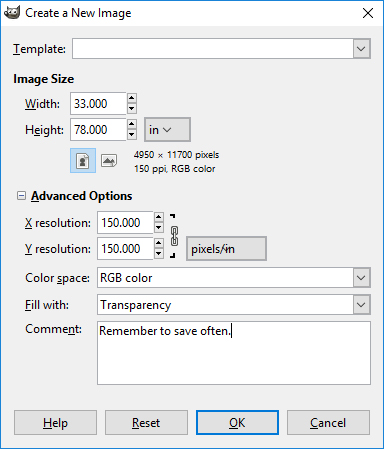
We need a few more options than what is provided by default so click the + Advanced Options icon, and fill in these boxes.

Since we’ve ordered a PDE03P http://www.canadiandisplay.ca/33-Roll-Up-Retractable-Banner-Stand-With-Print-p/pde03p.htm we’re going to need to make this file 33” wide by 78” tall. Make sure to set the resolution of the x and y axis to 150 dpi. You can use this opportunity to select the background colour for your banner, or leave it transparent if you wish to play with some imagery later on.

Click ok, and you may see this prompt come up

image-03

it’s fine to click “OK” unless your computer has a hard time dealing with this large of a file.


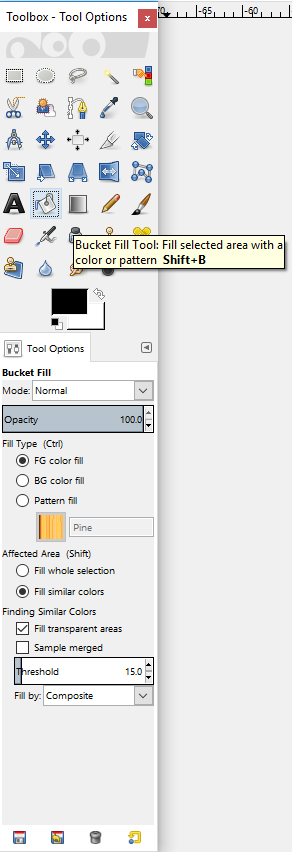
If you’re finding your choice of background colour was off, or you would like to add one, you can do so by going over to your tools palette and selecting the paint bucket tool. Pick the colour you wish to use, and click over your background layer.

image-04


This image processor uses a concept known as layers to accomplish creating your designs. You can create a new layer to put artwork on, and if you don’t like what’s going on with your image, you can toggle the layers on/off or delete them entirely.


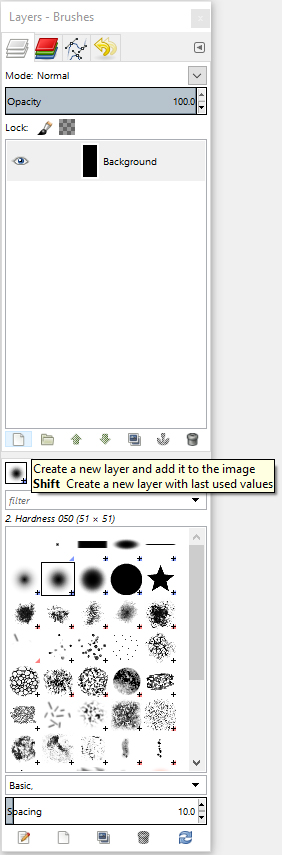
To create a new layer, you can go to your layer palette and select create a new layer

image-05

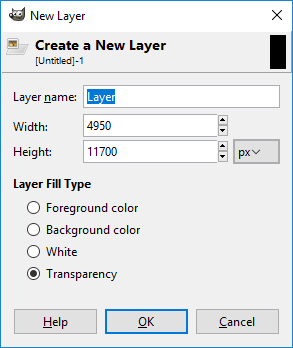
You’ll be prompted to give the layer a size (it will be the size of your document by default, don’t change if not necessary)

image-06

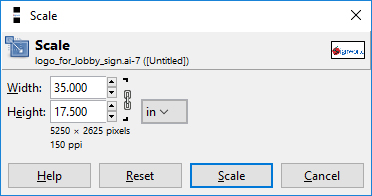
Do you have an existing logo or graphic you need  included in your banner? Locate the file on your system and drag into GIMP your .ai/.eps/.pdf graphics. Set the resolution of the graphic to 150dpi.

image-07

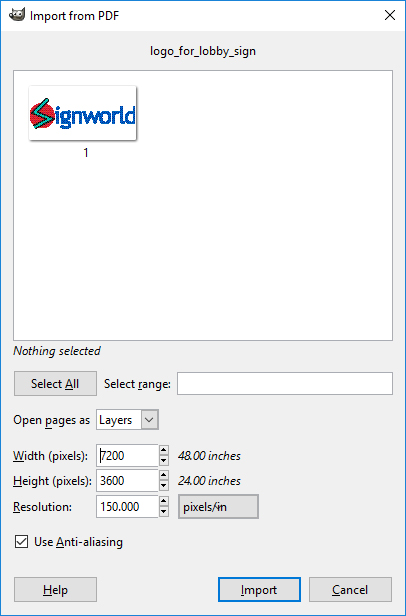
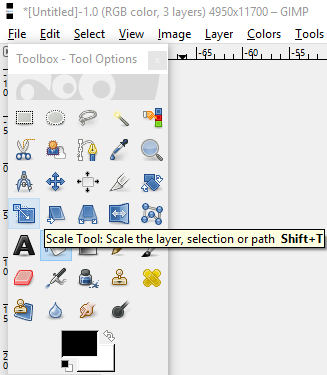
If you need to use the scale tool, remember to click the small chain to keep the original proportions of the graphic intact.

image-08

image-09

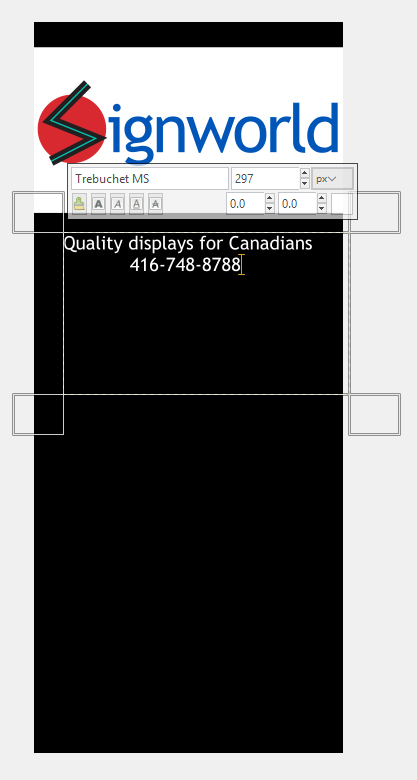
Have some text you wish to put on your banners? In the tool palette, there will be a text tool. Click this, and drag out a box to fill with your desired text. A small dialogue box should have opened up to give you the chance to change your font and text size.

image-10

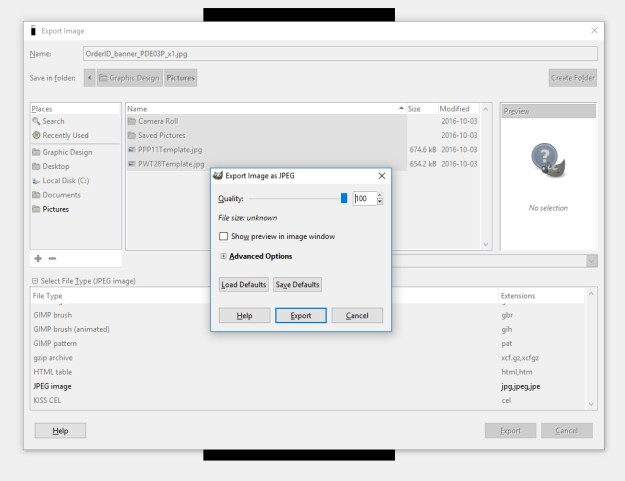
If you’ve completed your design, you can save your design using File > Export Image.

Be sure to select .jpg or .jpeg and rename your banner artwork with your order ID (You will have received this after checkout was completed) (IMAGE 11)

image-11


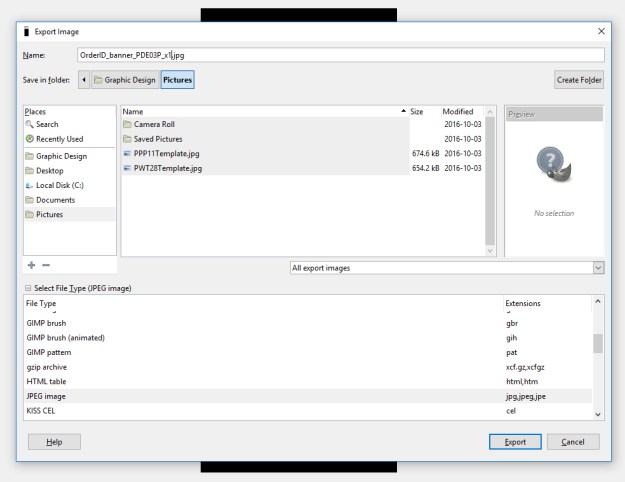
Ensure your jpeg is being saved as the maximum quality it can be (100) and click “Export”

image-12


Now you’ll be ready to upload your artwork for your brand new banner here: http://www.canadiandisplay.ca/Artwork-Upload-s/1836.htm

It’s Not A Vacation: How to Make the Most of Your Next Trade Show

The Business-to-Business Community blog is a font of knowledge and advice when it comes to making the most of your next trade show. If you want prospects to be storming your booth, take one of their latest Tips guides to heart:

As booths get more and more creative, the standard type of presentation must be tossed aside. The following are a few key concepts to jazz up your booth and increase traffic.

[snip]

  • Experiential Marketing: Customers want an experience these days, and creating one in your booth is the best way to get your brand out there. People are more inclined to remember an experience over a dry sales pitch. This can include concepts like a photo booth, virtual reality experience, or interactive kiosk.

Photo booths are inexplicably trendy these days, and you can easily make a space for one using a retractable vinyl banner or a backdrop. People love this kind of stuff, and makes your experience stand out from the rest.


World Heavy Oil Congress 1


How Trade Show Marketing Can Get You The Leads that Matter


If you’re in the business of business to business sales, Trade Shows are one of the leading provider of leads. No other strategy really comes as close to providing you with top quality prospects like meeting face-to-face.

But we know what you’re thinking: I still don’t know how to get leads, even if one might be three feet away from me! How do I convert this living, breathing person into someone who’ll want to do business with me?

The Business2Business Community site heard your concerns, and they’re here to help: “How to Get Killer B2B Leads at Trade Shows:”

When it comes to trade shows, you might think that generating B2B leads is a piece of cake. After all, you’re under one roof, engaging with those who have an active interest in your industry, often for multiple days.

One of their greatest pieces of advice is how to handle “the press:”

Typically, a trade show will release a list of press members who are covering the show. This may include bloggers, influencers, and journalists.

While these contacts are not themselves leads, their audience is. One of the most important steps you can take to snag time with these influential people is to reach out to them by email at least several weeks before a show. Request that they stop by your booth, and if possible, schedule a time for them to do so. Remember that media get jammed at trade shows so you want to be early enough for them to see you. If they are overscheduled or not attending the conference, not to worry. Offer them the opportunity to interview you in advance and embargo the interview till the show.

If you can, give them samples, a free trial, or a demo of your product or service. And don’t forget to provide background information or any helpful collateral.

You might think you don’t have anything to offer a news site because you’re not Beyonce or Jay-Z or any one of the innumerable Kardashian clan, but there’s always a market for content, and YOU are it. Especially if you can help a site’s target audience.

Check out the entire article, and take your trade show excursion to the next level!


Car Dealers Increase Revenue, Streamline Marketing With Conferences and Trade Shows

Car dealers may think that there’s nothing new under the sun for them to learn about selling vehicles. Those dealers are going to be left in the dust, because there’s still a TON that even the smallest car dealer or automotive industry professional can learn about selling cars, car parts, or accessories.

And that happens at the NADA 2016 Convention.

The Toronto Star featured an article prior to last year’s show by an Ontario-Area dealer describing exactly what’s in store for automtive professionals at NADA:

“… NADA Convention & Expo is the largest trade show of its kind devoted to the retail automobile industry and it draws over 20,000 dealership personnel, industry professionals and participating exhibitors from around the world.”

“At the NADA, every product and service used within a dealership can be found at the show, from exterior signage, building design and architectural elements to automotive tools and diagnostic equipment, customer retention products and marketing systems. The NADA is a one-stop shop for all things dealership related.”

And you don’t even have to exhibit there to walk away with an advantage over your competitors:

“Not only do dealer principals and managers go to check out the array of products and services. For many (including myself), the NADA offers instructional workshops on dealership activities, such as fixed operations, human resources, digital marketing, health and safety, and more.”

Read the whole thing and then visit the NADA 2016 website.

Changing the Conversation: Selling Healthy When You Can’t Sell Cheap

Medical_Drugs_for_Pharmacy_Health_Shop_of_Medicine.png


If you’re in the healthy foods or living industry, you’ve probably noticed one particular fact that’s hard for most consumers to wrap their heads around: the healthiest option is not always the cheapest.

The healthy option always has the perception of being the pricier option:  just look at Booster Juice vs. the McDouble.

But even if this is true, it doesn’t have to look that way. You can market your health product or service so that your target demographic doesn’t think “I can’t afford that” but “I can’t afford not to afford that.”

Let’s say you’re heading to the Total Health Show and you’re redesigning your brand image. You’re going all out: large backdrop display, handouts, stickers, banner stand — your only problem is that you look at who’s booked next to you, and it’s some cheap thing that couldn’t possibly do what it claims to. It’s not nearly as healthy as your product, but it has an advantage — a much lower price point. You might not be able to beat your competitor on price, but there a few ways you can use design and marketing to show visitors why your product is tops:

  • Use an infographic to compare traditional products with yours. Instead of comparing the initial out of pocket expense, focus on how customers only have to purchase one of your products compared to the other guys 4.


  • Get the research: your product is proven to increase or decrease levels of x, which can lead to an increase in lifespan of x years — or an average loss of x inches — or an increase in energy — or whatever. Don’t even mention the price on your large displays if you can — you want price to be of secondary concern.


Want to really make the most of your marketing? Visit Signworld Canada for the latest trade show displays, business marketing products, and custom banner printing opportunities.

Something Old, Something New: Finding New Revenue in Old Products


The blog over at Technifold knows about this all too well:

“You’re the third printer to stop in this morning…
Sorry, we already have 4 print vendors…
Give me one good reason I should do business with you
instead of the 7 other guys on this street…”

That’s the kind of response I heard in my years on the street. Fortunately we had a specialty (short-run books and manuals) that gave us some unique capabilities.

One way around these objections is to make life as easy as possible for them.

Our suggestion?

Businesses often hold seasonal sales, so why not make it easy for them by providing seasonal templates?

Let’s say you have an old customer who’s gotten some vinyl banners printed from you to promote their business. They might think they don’t need anything else — after all, the old banner still works fine, and their message is getting out there.

But you know better.

Because Winter is Coming — or Valentine’s Day — or Thanksgiving — or Summer Vacation — or, well, you get the idea. And that old banner could always use a more festive-minded touch-up.

Using stock images or your own in-house graphic designer,  you can have a number of templates drawn up , ready for customers to have their logos, text, and messages dropped into.

Clients love it because it saves them from having to hire a graphic designer, and you’ll love it because clients love when you make things as easy as possible. Love love love.


Want to really make the most of your marketing? Visit Signworld Canada

for the latest trade show displays, business marketing products, and custom banner printing opportunities.

Bringing Home the Bacon: Marketing For and To Farmers


It’s become increasingly difficult to become a success — let alone make a living — as a farmer over the past few years. Increases in technological investments, government regulation, and competition have all contributed to the decline of small farms and agricultural companies.

On the other side of that sentiment is the fact that consumers in the western word are becomign icnreasingly mor einterested in the “buy local,” “organic” ethos that has propelled the proliferation of tiny farmers markets and artisan shops.

How can you kee your head above water and snatch up these valuable consumers who want to know the story of their food, from farm to plate?

Hubspot’s Marketing blog has an interesting article about how marketing by and to farmers and agriculture companies :

Farmer’s Market(ing)

“…farmers are also conscientious stewards of the land, water and animals in their care. They are the people that volunteer for the fire department, coach t-ball, sit on school boards and church councils, send their kids into the military and remember to take off their hats when the national anthem plays. They know their neighbors and support each other when times are tough.”

If you’re going to sell to farmers, or be a farmer, you have to know the mindset of what being a farmer is all about. And I think that snippet up there sums it up pretty nicely.


Want to really make the most of your marketing? Visit Signworld Canada for the latest trade show displays, business marketing products, and custom banner printing opportunities.